
NCERT Solutions Class 7 Maths Part 2 Chapter 6: Constructions and Tilings
Answers to every question in Part 2 Chapter 6, Constructions and Tilings, of Ganita Prakash Grade 7 (2026-27): the questions in the text, every Figure it Out, Math Talk and Try This, the arch and star designs, the tangram figures and all the tiling puzzles. Page numbers follow the book (pages 136–163). Constructions use only an unmarked ruler and a compass. Short notes: Part 2 Chapter 6 notes.
Eyes and the perpendicular bisector (pages 136–139)
Use this to construct an eye. Draw the supporting line XY. With any radius more than half of XY, draw arcs from X and Y above and below XY; they meet at A and B. With centre A and radius AX, draw the arc from X to Y below XY; with centre B and radius BX, draw the arc from X to Y above it. Rub out the supporting lines.
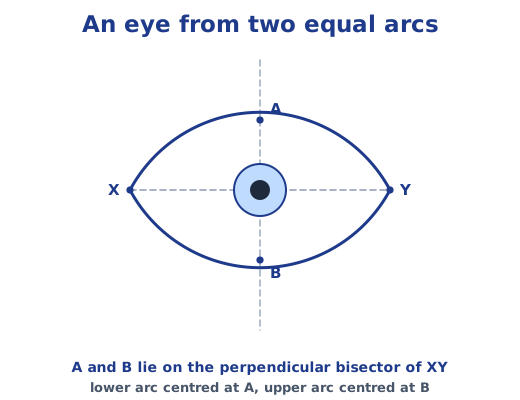
Where does AB meet XY, and at what angle? At the midpoint of XY, at 90°.
Is the line through the two meeting points always the perpendicular bisector, whatever the lengths? Yes. Which two triangles should be congruent? ΔAOX and ΔAOY. AX = AY and AO is common; also ΔABX ≅ ΔABY by SSS (AX = AY, BX = BY, AB common), so ∠XAO = ∠YAO. Hence ΔAOX ≅ ΔAOY by SAS, giving OX = OY and ∠AOX = ∠AOY. As the two angles add up to 180°, each is 90°.
Eyes of different shapes; will C and D lie on AB? Choose other points C and D with CX = CY = DX = DY and use them as centres. Yes, they lie on AB: the line through any two points equally far from X and Y is the perpendicular bisector, and XY has only one perpendicular bisector.
Justify that every point equally far from X and Y is on the perpendicular bisector of XY. Let P be such a point, and take B, below XY, also equally far from X and Y. By what we proved, the line PB is the perpendicular bisector of XY. There is only one such line, so P lies on it. (If P is on XY itself, PX = PY makes P the midpoint, which is also on the bisector.)
Figure it Out (page 140)
1. Must the arcs above and below XY have the same radius? No. Use one radius for the pair above and a different one for the pair below. Each meeting point is still equally far from X and Y, so both lie on the perpendicular bisector, and two points fix the whole line.
2. Can both pairs of arcs be on the same side of XY? Yes, with two different radii, so that the meeting points are different. Both points are equally far from X and Y, so the line through them is the perpendicular bisector. Keep the points well apart for an accurate line.
3. Within one pair, must the two arcs have the same radius? Yes. The meeting point must be equally far from X and Y. If the arc from X had a different radius from the arc from Y, the meeting point would be nearer one end and would not lie on the perpendicular bisector.
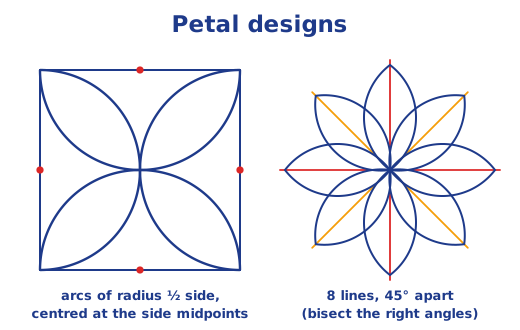
4. The four-petal design. Draw a segment and its perpendicular bisector, so that two lines cross at right angles at O. Mark points at the same distance from O on all four arms. Each petal is an eye on one half-arm: find two centres on the perpendicular bisector of that half-arm, equally far from it on either side, and draw the two arcs. Then trace the outline in colour.
A 90° angle at a point (page 141)
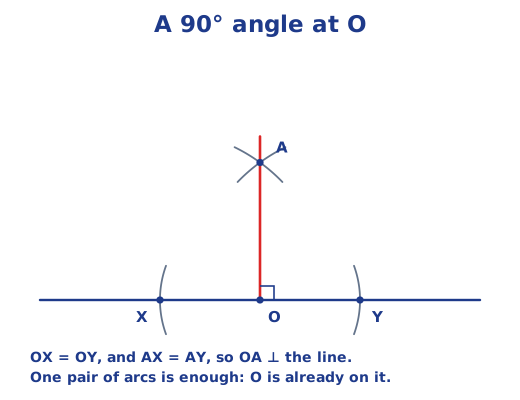
Construct a 90° angle at O. Do we need two pairs of arcs? With centre O, cut the line at X and Y, making O the midpoint of XY. From X and Y draw arcs of a larger radius meeting at A, and join OA. No, one pair of arcs is enough, because O is already a point on the perpendicular bisector.
Rope constructions of the Sulba-Sutras (pages 141–142)
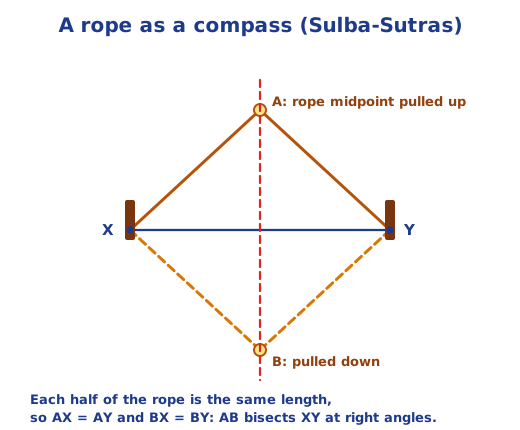
1. Why is AB in Fig. 6.4 the perpendicular bisector? The two halves of the rope are equal and both stay fully stretched, so AX = AY and BX = BY, each being half the rope. A and B are each equally far from X and Y, so the line AB is the perpendicular bisector of XY.
2. Other rope methods for 90° at a point O. (i) Use a short piece of rope from O to mark X and Y on the line on either side, with OX = OY; then use the folded-rope method to find A with AX = AY; OA is perpendicular to the line. (ii) (Extra) The Sulba-Sutras also used rope triangles with sides in the ratio 3 : 4 : 5: with knots at 3, 4 and 5 equal parts and the rope stretched into a triangle, the angle between the 3 and 4 sides is a right angle.
Angle bisection (pages 143–145)
The angle between adjacent supporting lines of Fig. 6.5, and how to make it. 360° shared equally by 8 lines gives 45°. Construct 90° and bisect it.
Figure it Out (pages 144–145)
1. Bisect four different angles. For each angle, draw an arc from the vertex O cutting the arms at A and B; from A and B, with one radius more than half of AB, draw arcs meeting at C; join OC.
2. The 8-petalled figure. Draw two perpendicular lines through O and bisect the four right angles, giving eight lines 45° apart. On each line, mark a point at the same distance from O and draw a petal from O to it like an eye, with two equal arcs.
3. Arcs drawn on the other side, towards O: is OC still the bisector? Yes, as long as the arcs meet at a point C different from O. OA = OB, AC = BC and OC is common, so ΔOAC ≅ ΔOBC by SSS, and ∠AOC = ∠BOC.
4. Other angles from bisection; can you construct 65.5°? From 90° you get 45°, 22.5°, 11.25°, and so on; adding gives 67.5° = 45° + 22.5° and 135° = 90° + 45°. 65.5° cannot be made this way, since it is not a sum of such halves. (The book may mean 67.5°, which can.)
5. Bisect an angle with a rope. With one length of rope held at O, mark A and B on the two arms, so that OA = OB. Tie the rope’s ends at A and B, pull its midpoint tight to mark C, with CA = CB, and join OC.
6. The four petals in a square, as large as possible. Mark the midpoints of the four sides by perpendicular bisectors. With each midpoint as centre and half the side as radius, draw the arc inside the square. Each arc passes through the centre and two corners, and the four arcs make four petals from the centre to the corners.
Repeating units and copying angles (pages 145–147)
Draw an angle and copy it. Draw an arc from the vertex A cutting the arms at B and C. Draw a ray from X and an arc of the same radius cutting it at Z. Open the compass to BC and mark Y on the new arc with ZY = BC. Join XY. ΔABC ≅ ΔXYZ by SSS, so ∠X = ∠A.
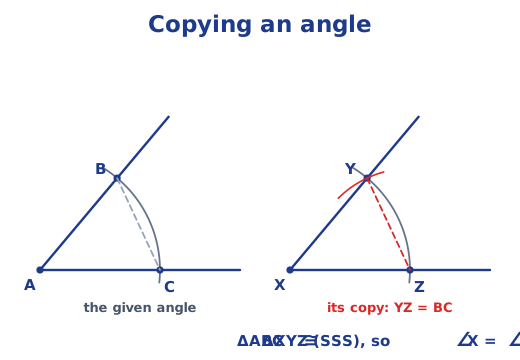
Figure it Out (page 147)
1. Copy four angles in different orientations. Use the same steps for each angle, drawing the new ray in any direction you like.
2. Construct Fig. 6.6. Each unit is a fan: two equal arms and an arc between their ends, centred at the vertex. Draw one unit. At the far end of one arm, copy the same angle the other way up, using the same arm length and radius, so that neighbouring units share an arm. Repeat across, then shade every other unit.
Parallel lines (pages 147–148)
Figure it Out (page 148)
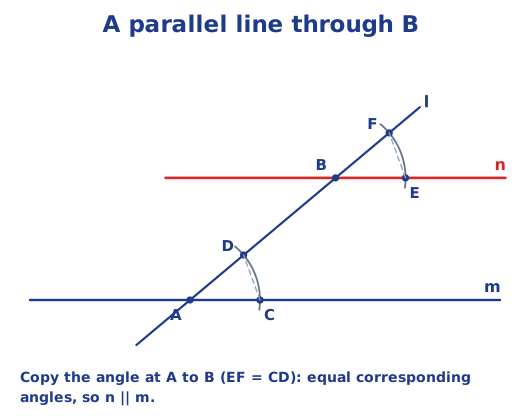
1. Four pairs of parallel lines. For each, draw a line m and a transversal l meeting it at A; pick B on l; copy the angle at A to B in the corresponding position; the new line through B is parallel to m.
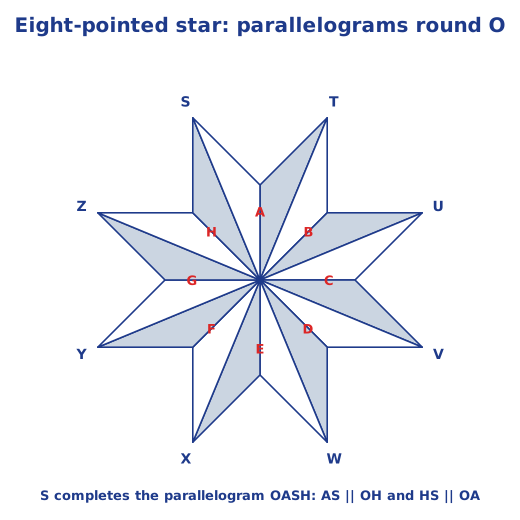
2. The eight-pointed star. Draw a circle with centre O and eight lines through O, 45° apart, by bisecting right angles; they meet the circle at A to H. Each point of the star completes a parallelogram: for S, draw through A a line parallel to OH and through H a line parallel to OA; they meet at S. Do the same for T, U, V, W, X, Y and Z, join each outer point to O, and shade one half of every parallelogram.
Arch designs (pages 149–151)
How were the arches made? By first drawing them on a flat surface such as paper or stone, using support lines and arcs.
Trefoil arch: the support lines and the arch. Draw AD. Construct equal angles at A and D by copying one angle, and mark B and C with AB = DC; join BC. Find the midpoints of AB, BC and CD with perpendicular bisectors, and draw semicircles outwards on AB, BC and CD. Adjust the radii if the arch looks better that way.
Pointed arch: which support lines? Can it be drawn from the midpoints? Two equal segments meeting at the top, with their midpoints marked. Yes: on each segment draw the lower half as an arc bulging outwards and the upper half as an arc bulging inwards, like the wavy wave of Class 6. The two upper arcs meet in a point.
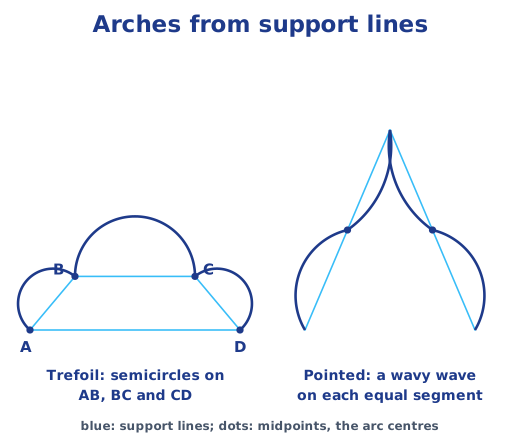
Figure it Out (page 151): 1. Pointed arches of different shapes; 2. Your own arches. Change the radii of the arcs, or the angle between the support lines, to get narrower or wider arches; combine semicircles and pointed arcs for your own designs.
Regular hexagons (pages 151–154)
Try This: a pentagon and a hexagon with equal sides. Choose a length, draw one side and use the compass to make each next side the same length. The sides come out equal, but the angles usually do not, so the shapes are not regular.
Will all six triangles be equilateral? Can six of them fit round a point? Yes. The angles around a point add up to 360°, and six 60° angles make exactly 360°, so six congruent equilateral triangles fit with no gap or overlap. The hexagon they form has equal sides, and each of its angles is 60° + 60° = 120°, so it is regular.
Will the 70° angle fit the gap? 40° + 60° + 50° + 30° + 40° + 90° = 310°, so the gap ∠AOI is 360° − 310° = 50°. A 70° angle does not fit; it would overlap by 20°.
Why are AOD, BOE and COF straight lines? For example, ∠AOB + ∠BOC + ∠COD = 60° + 60° + 60° = 180°, a straight angle. The same holds for BOE and COF.
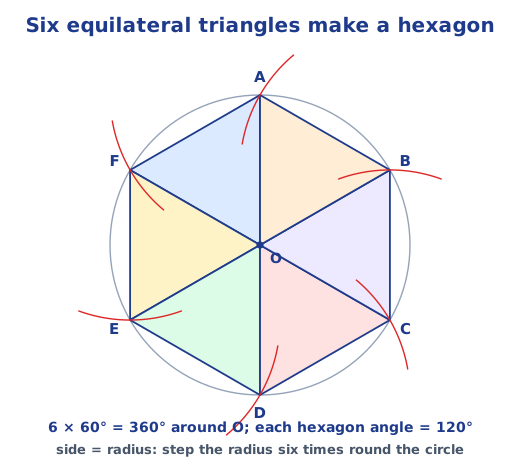
Construct a regular hexagon of side 4 cm, and of side 5 cm. Draw a circle of radius 4 cm (or 5 cm). With the same opening, mark a point on it and step round the circle, marking six points; join them in order. Each side equals the radius, because each pair of neighbouring points forms an equilateral triangle with the centre.
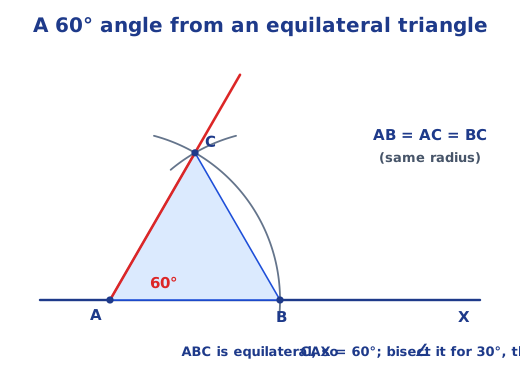
How do we construct 120°? Why is ∠CAX = 60°? Construct 60° and take the angle beside it on the straight line: 180° − 60° = 120°. In the 60° construction, AB = AC (the first arc) and BC = AB (the second arc, same radius), so ΔABC is equilateral and each of its angles is 60°.
Related constructions (pages 154–155)
Math Talk: 30° and 15°. Bisect 60° to get 30°, and bisect 30° to get 15°.
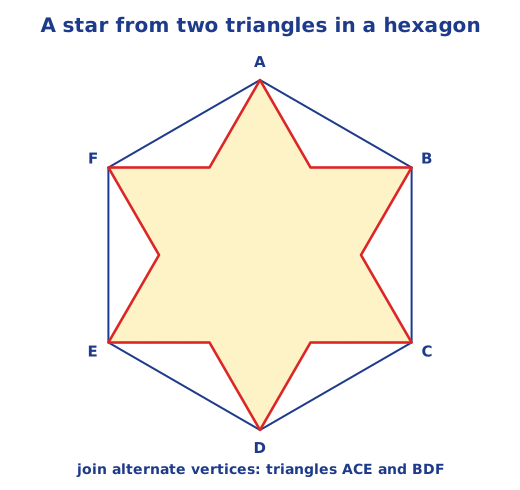
The 6-pointed star; are its six point triangles equilateral? Construct a regular hexagon GHIJKL and extend its sides; or join alternate corners of a larger regular hexagon ABCDEF to draw two big equilateral triangles. Yes, each point triangle is equilateral: each of its base angles is next to a 120° angle of the hexagon on a straight line, so it is 60°, and the third angle is 180° − 120° = 60°.
Figure it Out (pages 154–155)
1. (a) The inflexed arc. Draw two vertical posts of the same height and join their tops; mark the midpoint M of this line. Mark points above each post top, as high above it as half the width. With these points as centres, draw arcs from each post top up to the point directly above M; the two arcs meet in a sharp point at the top.
(b) The six-petalled flower, with only a compass. Draw a circle. With the same radius, step round it to mark six points. With each point as centre and the same radius, draw the part of the circle that lies outside the first circle, from one neighbouring point to the other. The six arcs form six petals with pointed tips.
(c) A hexagon in a circle. Draw a circle, step the radius round it six times and join the six points.
(d) Six circles in a ring. Draw a circle of radius r and step r round it to get six points. Bisect one radius to find r/2, and draw circles of radius r/2 at the six points; neighbouring circles just touch.
(e) The hexagon with triangles. Construct a large regular hexagon and divide it into six equilateral triangles from the centre. Mark the midpoints of all the sides and join them with lines parallel to the sides, to cut every triangle into four small equilateral triangles. In each small triangle, join the corners to its centre, found where two angle bisectors meet.
2. Optical illusion. We seem to see a bright white triangle on top of another triangle, though no edge of it is drawn. Our brain joins the cut-out corners of the three dark circles into a triangle. To recreate it, draw an equilateral triangle lightly, draw a dark circle at each corner, draw the corners of a second, upside-down triangle, and rub out the light lines inside the circles and the triangle.
3. The star in a hexagon. Construct a regular hexagon and join alternate corners, drawing two equilateral triangles. Their outline is a six-pointed star whose points are the hexagon’s corners. Keep the hexagon and the star’s outline and rub out the lines inside.
4. A perpendicular to l through a point P outside it. With centre P, draw an arc cutting l at X and Y, so that PX = PY. P is then on the perpendicular bisector of XY. Draw arcs of equal radius from X and Y on the other side of l, meeting at Q. The line PQ is perpendicular to l.
Tangrams (pages 155–156)
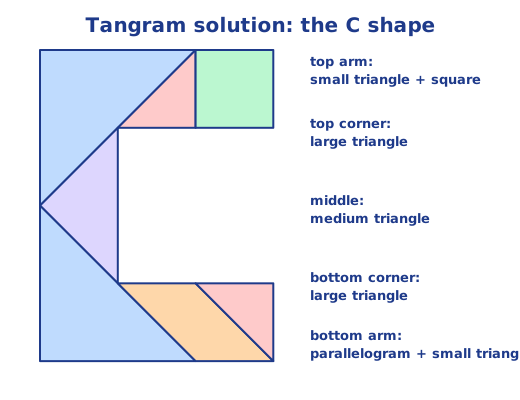
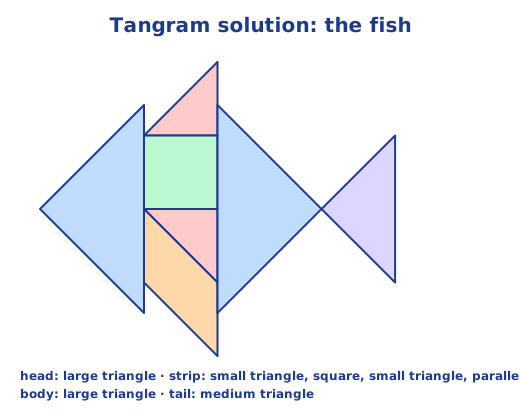
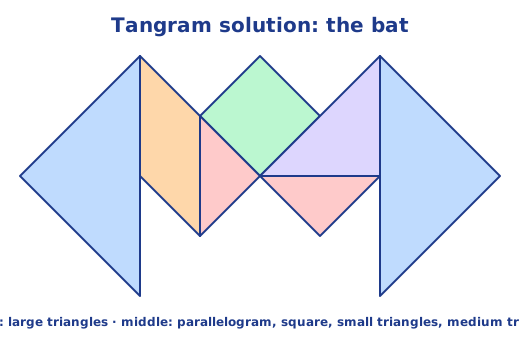
How can the tangram pieces form each figure? Every figure uses all seven pieces and has the same area as the original square. Start with the two large triangles, which cover half the area, in the biggest triangular parts of the figure; then fit the medium triangle, the square and the parallelogram; the two small triangles usually fill narrow tips such as ears, fins and feet. Four of the figures worked out:
- The C shape: down the left side, a large triangle, the medium triangle pointing left, and the other large triangle; along the top, a small triangle and the square; along the bottom, the parallelogram and the other small triangle.
- The fish: the head is a large triangle; a strip made of a small triangle (top fin), the square, the other small triangle and the parallelogram (bottom fin); the body is the second large triangle; the tail is the medium triangle.
- The bat: the wings are the two large triangles; between them stand the parallelogram, the square tilted like a diamond with a small triangle below it, and the medium triangle with the other small triangle under it.
- The cat: the face is the square with the two small triangles as ears; the body is the two large triangles with the medium triangle between them; the tail is the parallelogram.
Tiling grids with 2 × 1 tiles (pages 157–160)
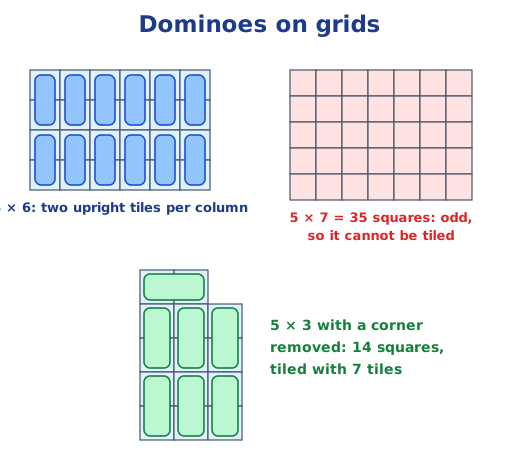
Can a 4 × 7 grid be tiled? A 5 × 7 grid? 4 × 7: yes, two upright tiles in each of the 7 columns. 5 × 7: no.
Complete the justification. Each tile covers exactly 2 squares, so any number of tiles covers an even number of squares. The 5 × 7 grid has 35 squares, an odd number, so no set of tiles can cover it exactly.
An m × n grid with both m and n even: yes, upright tiles fill each column, since the number of rows is even.
One of m and n even, the other odd: yes. If the number of rows is even, fill each column with upright tiles; if the number of columns is even, fill each row with flat tiles.
Both m and n odd: no, because m × n is then odd.
The 5 × 3 grid with a corner removed: yes. Lay one flat tile in the short row, then fill the 4 × 3 block below with upright tiles, two in each column.
The 5 × 3 grid with the middle square of the second row removed: yes. Numbering rows 1 to 5 from the top and columns 1 to 3: upright tiles in column 1 (rows 1–2 and 3–4), column 2 (rows 3–4) and column 3 (rows 2–3 and 4–5), and flat tiles in row 1 (columns 2–3) and row 5 (columns 1–2).
Fig. 6.13 (top middle square removed): can it be tiled? How can we be sure? No. Colour the squares like a chessboard. Each 2 × 1 tile covers one black and one white square, so a tiled region needs equal numbers of each. This region has 8 white and 6 black squares.
A plain grid can be tiled: can its black-and-white version? And conversely? Yes, both. Any tile covers two neighbouring squares, which always have different colours, so a plain tiling automatically puts each tile on one black and one white square. And a black-and-white tiling is a plain tiling if we ignore the colours.
Can the black-and-white region of Fig. 6.14 be tiled? No: 8 white squares, 6 black.
Another square whose removal makes the 5 × 3 grid non-tileable. Any black square: the bottom middle square, the centre square, or the first or last square of the second or fourth row. Removing any of the 8 white squares (the corners, the middle squares of rows 2 and 4, or the end squares of row 3) leaves 7 and 7, and those grids can all be tiled.
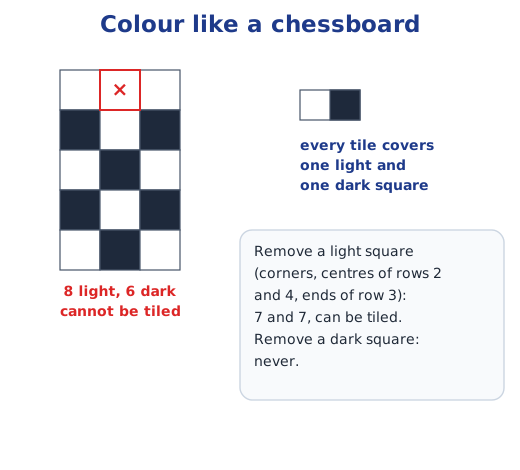
Figure it Out (page 160)
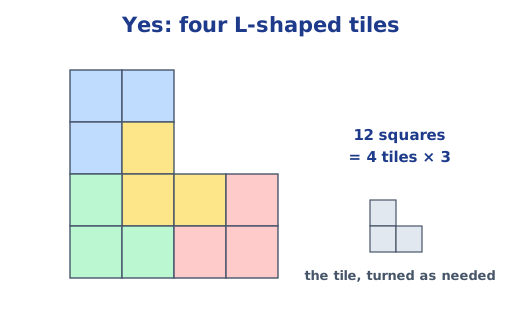
1. The region with the L-shaped tile: possible. The region has 12 squares, so 4 tiles are needed. One way, numbering rows 1 to 4 from the top and columns 1 to 4: tile 1 covers row 1 (columns 1, 2) and row 2 column 1; tile 2 covers row 2 column 2 and row 3 (columns 2, 3); tile 3 covers row 3 column 1 and row 4 (columns 1, 2); tile 4 covers row 3 column 4 and row 4 (columns 3, 4).
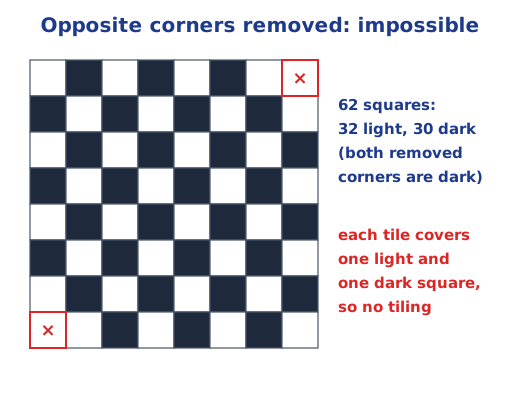
2. The 8 × 8 grid with two opposite corners removed: not possible. It has 62 squares. Coloured like a chessboard, the two opposite corners have the same colour, so 32 squares of one colour and 30 of the other remain, while every 2 × 1 tile covers one of each.
Tiling the plane (pages 160–162)
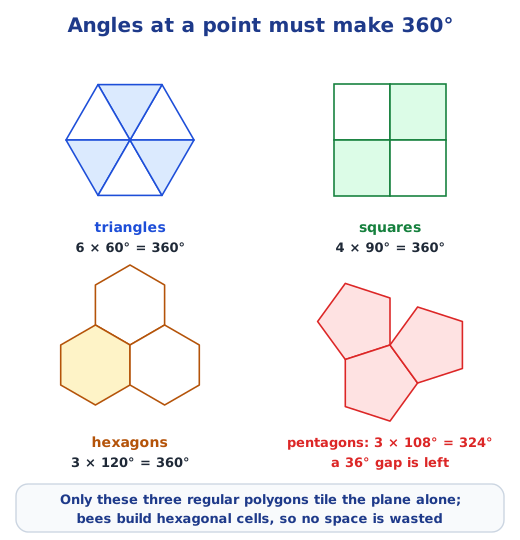
A shape whose copies tile the plane; other regular polygons? Squares, and also equilateral triangles and regular hexagons. (Extra) Any rectangle, parallelogram or triangle also works. These three are the only regular polygons that tile the plane alone: the angles at each point must add up to 360°, which works for 6 × 60°, 4 × 90° and 3 × 120°, but a pentagon’s 108° and the larger angles of polygons with more sides cannot fill 360° exactly.
Tilings in daily life. Floor and wall tiles, brick walls, paving stones, chessboards, honeycombs and the hexagonal cells of wasp nests.
Practice
-
Which angle can you get by bisecting a 90° angle twice?
Show answer
Answer: (c) 22.5°
-
A 6 × 5 grid is to be tiled with 2 × 1 tiles. Which is true?
Show answer
Answer: (b) It can be tiled, since 6 is even
-
In the copy-an-angle construction, which length is carried by the compass to the new arc?
Show answer
Answer: (b) The chord BC between the arms
-
A 7 × 7 grid has its centre square removed. Can it be tiled with 2 × 1 tiles?
Show answer
Answer: Yes. With chessboard colours whose corners are light, the 7 × 7 grid has 25 light and 24 dark squares, and the centre square is light. Removing it leaves 24 and 24. A tiling exists: tile the outer ring of 24 squares with 12 tiles going round, and the 5 × 5 ring inside it and the 3 × 3 ring inside that in the same way.
-
How many degrees does the gap measure if four regular pentagons meet at a point?
Show answer
Answer: Four angles of 108° add to 432°, which is more than 360°, so four pentagons would overlap by 72°. Three leave a gap of 36°. Either way regular pentagons cannot meet neatly at a point.
Stuck on a question?
Take a photo and Lagnever AI explains it step by step. Try it for 7 days for ₹2.
Get it on Google Play Open in browser
For parents: after the trial, the plan renews monthly by UPI or card autopay. You can cancel anytime in the app.